Gluten-Free Sugar Cookies

Christmas means a lot of things: twinkly lights, the fantastic smell of pine trees everywhere, looking for perfect presents — and cookies. Obviously.
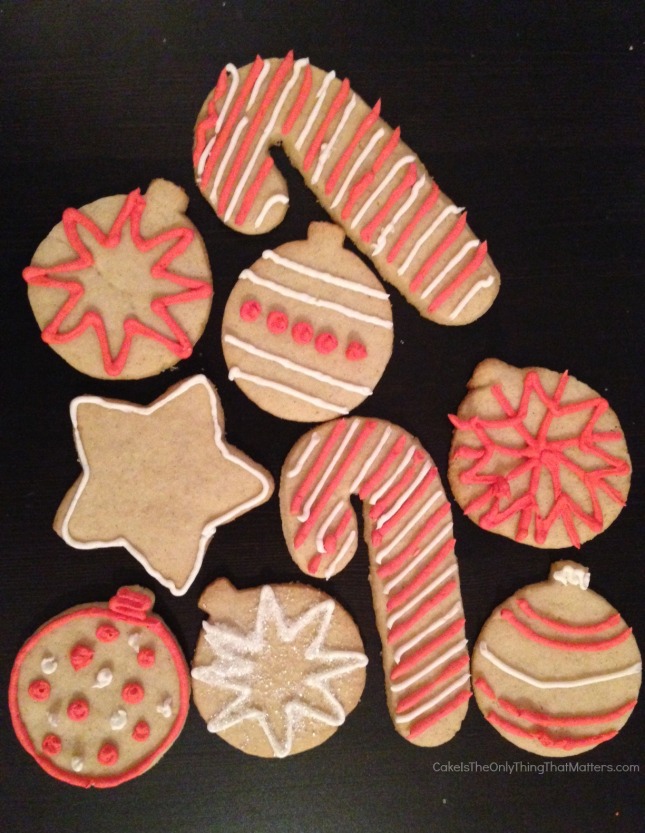
GORGEOUS gluten-free sugar cookies for ChristmasMy mom gave me a fun little book with tons of beautiful ideas and instructions for decorating Christmas cookies this year…using royal icing. My only experience with royal icing before now was in the form of gingerbread house kits. All the gorgeously iced cookies you see in stores use royal icing, but it is one of the most difficult icings to work with. The consistency needs to be exactly right. You have to work very quickly and keep any icing you’re not using in airtight containers. The weather outside can affect how it mixes up.

Nervous, I decided to just decorate these cookies with piping royal icing (flood icing is a more liquid-y version that you use to cover the entire cookie). It was hard, my hand hurt, and I made a bunch of ugly cookies at first, but the end results were quite pretty! These are definitely cookies to impress.

It says a lot about the difficulty of royal icing that I went on about it for two paragraphs and haven’t even gotten to making gluten-free sugar cookie dough. The Internet, surprisingly, was not flush with very many recipe options, so I adapted a recipe from Bon Appetit Desserts instead. This dough holds together quite well, but you’ll need to keep your cookies on the thick side — roll them out no thinner than 1/4 inch. I also recommend rolling out your chilled dough on floured parchment or wax paper, putting it back in the fridge to chill for a bit, and then cutting out your cookies. (And let’s be real here — everyone knows thicker sugar cookies are better anyway.)
Gluten-free Christmas cookies YUMIf you don’t want to mess with royal icing, 2 cups of confectioners sugar + 2 tablespoons of milk + a splash of vanilla makes for a lovely glaze.

Gluten-Free Sugar Cookies
Ingredients
2 2/3 cups gluten-free all-purpose flour, plus extra for duting (I like King Arthur)
1 tsp baking powder
1 tsp xanthan gum
1/2 tsp salt
1/4 tsp nutmeg
3/4 cup sugar
1 stick (8 tablespoons) salted butter, softened
1 stick unsalted butter, softened
3 egg yolks (from large eggs)
2 tsp vanilla bean paste or vanilla extract
one batch of royal icing at piping consistency, flavored and colored to your wishes (I used a mix from my favorite baking supply store, but here are a bunch of recipes)

In a medium bowl, mix together flour, baking powder, xanthan gum, salt, and nutmeg with a fork until very well combined (then mix a little more. You do not want any unmixed pockets of xanthan gum). Set aside.

In the bowl of an electric mixer fitted with the paddle attachment, cream butter and sugar at medium-high speed until super fluffy, at LEAST five minutes. Do not get impatient; go catch up on Twitter or something. Scrape down sides of bowl and add eggs and vanilla; mix on medium speed for one minute. Scrape bowl again, then add flour and mix on stir until well combined. Divide dough into thirds. Form each portion into a disk, flatten, and wrap in plastic wrap. Chill until firm, at least two hours and up to two days.

Preheat oven to 350F. Working with one disk at a time, roll out dough on a very well floured piece of parchment or wax paper, using a well-floured rolling pin (tapered rolling pins are where it’s at). Do not roll dough any thinner than 1/4 inch. Place rolled dough back in the fridge for 5 to 10 minutes (you can start rolling out your next disk while you wait). Remove rolled dough from fridge and cut out shapes of your choice. Place on cookie sheets about 1/2 to 1 inch apart and bake for 11 minutes. Let cool on cookie sheets for a few minutes, then carefully transfer to racks to cool completely.

When ready to decorate, make your icing and decorate as you wish. If you’re a royal icing beginner like me, stripes and polka dots are a good place to start. Think before tweeting a photo of them, or your coworkers will see and you’ll have to bring them all to work.

Gluten-Free Etiquette + A [Gluten-Full] Recipe for the Best Chocolate Chip Cookies

The best chocolate chip cookie recipe EVER from Cake Is The Only Thing That MattersWith less than a week to go before I go gluten-free, I’ve been preparing by a) making a list of foods I need to buy and b) eating as much gluten as possible. I’ve also been studying lists of surprise gluten sources and making lists of restaurants that offer gluten-free options as June fast approaches. But June also means the full throes of wedding season, and I’m wondering: what’s the etiquette on making sure you can have food to eat at weddings and similar events? One wedding I have this summer is that of one of my closest friends, and I didn’t feel uncomfortable at all talking to her about it. The level of our friendship meant that she both sent me the full menu and gave me her contact person at the catering company so that I could call to double check. But obviously, not all weddings and related events lend themselves to that level of comfort. So, gluten-free folks, what do you do in these situations? I’d really love to know.

And now, a lighter note.

As I said, I’ve been eating as much of my favorite gluteny things as possible lately. One of those things is this recipe for chocolate chip cookies. Any baker will tell you that the quest for the perfect chocolate chip cookie recipe is not an easy one, and that it took them a long time to find a good base to adapt off of. This recipe is adapted from Bon Appetit’s Desserts cookbook, more commonly known as my bible. One of my first projects (after the heat of summer) is to work on adapting this recipe to be gluten-free, because it’s too good not to. A variety of my baking secrets are mixed in here that should still work with gluten-free flour, so if you’re adept at adapting recipes, feel free to work off of this and let me know how it goes! If you’re not gluten-free, make this as is, and enjoy. It takes a bit of advance planning, but is well worth it.

The Best Chocolate Chip Cookie Recipe Ever
(adapted from Bon Appetit Desserts)

Ingredients
2 1/2 cups all-purpose flour
1 teaspoon baking soda
1 teaspoon salt
1 stick (1/2 cup) salted butter, softened but still cool
1 stick (1/2 cup) unsalted butter, softened but still cool
1 cup brown sugar, packed (I use Trader Joe’s organic brown sugar, which does not come in dark/light, but if you have both I’d recommend using dark brown)
3/4 cup regular sugar
2 large eggs
2 overflowing teaspoons vanilla bean paste (pure vanilla extract will also work)
1 regular-size bag semisweet chocolate chips

Combine flour, baking soda, and salt in a medium bowl and stir with a fork. Set aside.

In the bowl of an electric mixer with the paddle attached, beat butter on medium speed for one minute until smooth. Add in both sugars, mix on low for about 15 seconds so you don’t get sugar all over your kitchen, then beat on medium speed (4-6 on a KitchenAid) until light and fluffy, about 3 minutes. Add eggs and vanilla and beat until well-combined and fluffy, about one minute. Add in flour mixture and mix on low speed (stir on a KitchenAid) until half combined, then dump in chocolate chips and mix until just combined.

Cover bowl with plastic wrap and let rest in the fridge at least 3 hours but up to 24.

When you’re ready to bake, preheat oven to 375 degrees F. Scoop out a bit more than a rounded tablespoon’s worth of dough and roll between your hands to form a ball, then place on cookie sheet. Bake for 12 minutes, rotating sheets top to bottom and back to front at the 6 minute mark (I know it’s annoying, but don’t skip this step or your cookies won’t bake evenly, no matter how snazzy your oven is). Let cool on sheet for one minute, then move to cooling rack. Repeat with remaining dough. Makes 4 dozen cookies.

Angry Birds Pig Cookies

If you are a human living on this earth, you have heard of Angry Birds. And if you have downloaded it, you know that the pigs’ stupid-yet-cute faces are the best part.

This is not the first time I have expressed my love of pop culture in baking. For the Lost season six premiere last year, I made cookies in the shape of Dharma fish biscuits. So it was really only a matter of time before I decided to do another food-based art project. A visit to my boyfriend’s family in Houston (his mom loves the game) seemed like the perfect opportunity.
These are actually much easier to make than they may seem. The cookie recipe takes no time at all and requires no special ingredients, but you will have to go out for the detailed decorations. I got the sugar eyes at the most dangerous store in the city, New York Cake & Baking Supply on 22nd Street for $2.99, but you can definitely get them on Amazon. For the snouts and other details I used a small tube of black gel icing, which you could also use for the eyes with a tube of white.
This recipe makes twelve cookies, but since I halved the recipe I adapted it from, it can be easily doubled if you’re making them for a party. You can use all all-purpose flour instead of using some whole wheat, but it won’t affect the taste and the whole wheat gives the cookies a nice golden color. I strongly suggest rolling out the dough and cutting circles with a cookie cutter–I was in a rush for time and just rolled the dough into balls which I then flattened, which made for messy edges. You’ll still need to form the snouts by hand, unless you have a very tiny cookie cutter. Note that these pig bases do not have ears because they will burn before the cookies are baked through. They just won’t hear you squeal with delight. Heh heh heh.

For the Dough (recipe adapted from Bon Appetit Desserts)
1 stick unsalted butter, softened
6 tablespoons sugar
1 egg
1 teaspoon vanilla extract
1 cup all-purpose flour
1/3 cup whole-wheat flour
1/4 teaspoon salt
1/2 teaspoon baking powder

For the Glaze
1 to 1 1/2 cups confectioners sugar
1 tablespoon milk
1/4 teaspoon vanilla extract
green food coloring

Decorations
candy eyes
small tube black gel food coloring (also white if not using candy eyes)

To Bake:
Beat butter and sugar in the bowl of an electric mixer at medium speed until fluffy, about four minutes. Add egg and vanilla and beat until combined (batter will look curdled). Add flour mixture and mix on stir until just combined. If making the quick, ball-and-smash way, form dough into a disc and chill until somewhat firm, one hour. If rolling cookies out, separate into two, form into discs, and chill until firm, at least two hours.

After chilling, line two baking sheets with parchment paper and preheat oven to 350 degrees. If using quick method, grab large tablespoonfuls of dough and form twelve balls (you should have some dough left over). Space evenly apart on one cookie sheet and use the bottom of a glass to flatten to 1/4 an inch thickness. I highly recommend dipping the glass in flour before each flattening. Cookies might touch; this is okay. If rolling out, roll out dough to 1/4 an inch thick and cut twelve circles using a 3-inch cookie cutter and place on one cookie sheet. Using remaining dough or dough scraps, take a scant teaspoon at a time and form into ovals, also about 1/4 inch thick. You may have a few extra snouts, this is okay because you now have a snack. Place snouts on other cookie sheet.

Put sheets in oven and bake for six minutes, then remove snouts and bake bases for six more. Let snouts cool on sheet, but immediately move bases to cooling rack.

To Decorate:
In a medium bowl, stir together milk, vanilla and 1 cup sugar until smooth, adding more sugar if necessary to create a glaze that is thin enough to spread, but not too drippy. Add green food coloring until desired shade is achieved. If you use liquid food coloring (I used gel), you may need to add additional sugar to reach the right consistency. Working one or two cookies at a time, spread glaze on base, then a snout, and then gently press snout into base to adhere. If using candy eyes, gently press one next to each side of snout. Once all cookies are assembled, let glaze set for 20 minutes, then pipe on snout nostrils and little smiles. If using gel colors for eyes, let white set a few minutes before adding black. Store in a single layer, and try not to get blown up by birds.

Triple-Chocolate Chip Cookies

They say when life gives you lemons, you should make lemonade.

They also say that when life gives you so much Easter candy that you still have a ton left in May, you should make cookies.

Oh, do they not say that? Well, I say that. It’s sound advice. You should definitely follow it. Especially if you just bought a snazzy new stackable, space-saving tiered cooking rack and need to test it out. You know, to see if it works.

You can obviously use chips for this recipe, but chopped chocolate does melt through the cookies so nicely. I’d recommend you use real milk chocolate and not Cadbury Dairy Milk bars, which are what I had lying around–they developed a kind of grainy texture after baking. But I do recommend you follow at least one aspect of my recipe exactly: the butter. I use salted butter in this cookie, and it makes all the difference in the world. I’d go so far as to say that after this, you’ll switch to salted butter in all your drop cookie recipes.

This is not the definitive chocolate chip cookie, but it is quite tasty nonetheless. You can mess with the chocolate ratios below if you prefer one kind of chocolate more than the other (I am normally a dark-only girl, but I loved this combo). Feel free to swap out the whole wheat flour for all all-purpose flour; even though you can’t taste the whole wheat, the cookies do taste better when you eliminate the health aspect, like all things in life.

Triple Chocolate Chip Cookies (adapted from the Mrs. Fields Cookie Book)
1 1/2 cups all-purpose flour
3/4 cup whole-wheat flour
1 teaspoon baking powder
1/2 teaspoon baking soda
1/4 teaspoon salt
2 sticks salted butter, softened
1 cup brown sugar, packed (either light or dark–doesn’t matter)
1/2 cup granulated sugar
2 eggs
2 teaspoons vanilla extract (the real deal. Please, please do not use the fake kind)
1/2 cup milk chocolate, in chips or chopped
1 1/2 cups dark chocolate, in chips or chopped
1/4 cup white chocolate, in chips or chopped

Preheat oven to 300 degrees. Whisk flours, baking powder, baking soda, and salt in a medium bowl until well combined. Set aside.

In the bowl of an electric mixer, cream the butter and sugars together on medium until fluffy. Be patient–this will take at least 3-5 minutes. It’s ready when it kind of looks like a brownish buttercream. Scrape down the sides of the bowl. Add eggs and vanilla and mix just until eggs are completely incorporated. You should see no yolk streaks and the batter will look slightly curdled but smell wonderful. Scrape down sides of bowl again. Add the bowl of dry ingredients and all the chocolate (yes, at the same time) and combine on the lowest setting until just incorporated.

Scoop dough by rounded tablespoons onto baking sheets about two inches apart. If, like me, you have a tiny oven and thus can only use tiny baking sheets, they *can* be one inch apart but you will likely be separating cookies when they come out of the oven. Bake for 20-24 minutes, depending on your oven and how undercooked or crunchy you like your cookies, until golden. Cool on sheets for a few minutes, then transfer to a cooling rack to cool completely. Taste at least one cookie as soon as they are cool enough to handle. You know, for poison.