I’m Alive!

Hi blog!

I’m sorry I’ve abandoned you so. I’m still here, and I’m still avoiding all the glutens, and I’m still experimenting in the kitchen (oat flour, i<3u let’s get married).
gluten free doubtsBut.

My heart just isn’t in it. I don’t really feel like it’s doing anything, I’m getting really bored of my limited cafeteria options at work, I’m sick of not being able to eat all the free treats that arrive in my office on a regular basis — I’m just over it. I said I would stick it out for a full year, and that year mark is quite suddenly(!) around the corner in June. Come next month, I may reevaluate the gluten situation. I don’t feel like my life has changed for the better, but just changed in a inconvenienced way. I don’t know that I would renounce gluten-free things completely (I think at this point I might actually prefer quinoa pasta), but maybe I wouldn’t say no to a bagel. I don’t know. But it’s been hard to blog excitedly about gluten-free cooking when I don’t feel excited about a gluten-free lifestyle at all.

I do have some good recipes I would like to post, recipes I’d want to keep making no matter what, so don’t give up on me yet.

Easiest-Ever Vegetable Enchiladas

Mexican food is a gluten-free person’s dream, thanks to corn tortillas and sauces that rarely ever include flour. It’s one of my go-tos both for going out to dinner and cooking at home — my roommate and I have fajita night at least once or twice a month. Last weekend, we went out for Mexican, and the enchiladas I ordered had TOO MUCH CHEESE. I know, that’s not a sentence humans should utter, and certainly not a human like me, who would list cheese as her main food group. But since those unsatisfactory enchiladas, I’ve been craving good ones ever since.
Literally never seen an enchilada recipe this easy before!  (And if you use corn tortillas they're gluten-free!)I made enchiladas for the first time a few months ago, and the sauce was more work than making a Bolognese — so many ingredients, so many steps, and in the end it didn’t taste that enchilada-y. So for these, I did my favorite recipe move: glance at a few for inspiration, then make up your own.

The result was this insanely easy sauce, which takes just five minutes to put together, and involves mostly ingredients you probably already have in your kitchen. Sautéing some veggies and assembling it all is the only real work you have to do. Lazy dinners, and especially lazy dinners with cheese, are the best dinners (so good of dinners that I didn’t have time to compose a lovely photo for you before digging in, sorry!).

Easy, Gluten-Free Vegetable Enchiladas
Ingredients
olive oil
1 medium onion, cut in half and sliced
2 large bell peppers, sliced into strips
6 oz. baby spinach
1 14-ounce can tomato sauce (make sure it doesn’t have added corn syrup)
1/4 cup milk
2 tablespoons water
1 teaspoon salt, divided
1 teaspoon freshly ground black pepper, divided
1 1/2 teaspoons cayenne pepper, divided*
1/4 teaspoon red pepper flakes (optional)*
1/2 teaspoon hot sauce (optional)*
1/2 teaspoon garlic powder
1 teaspoon cumin
1 teaspoon tumeric
1/2 teaspoon dried onion (optional)
8 corn tortillas
1 cup shredded cheese (I used a “Mexican blend” but feel free to use cheddar/monterey jack/your choice)
*If you don’t like things super spicy, just use cayenne. If you like things moderately to a bit more than moderately spicy, use all the spices. If you like things super spicy, add another 1/2 teaspoon hot sauce

For the veggies: Heat enough olive oil to cover the bottom of a large skillet (medium heat). Add onions and peppers and season with 1/2 teaspoon salt, 1/2 teaspoon pepper, and 1/2 teaspoon cayenne. Cook, stirring occasionally, until vegetables are softened and beginning to brown, about 20 minutes. When ready, add in baby spinach and cook, stirring, until wilted. Turn off heat.

For the sauce: In a small saucepan over medium-low heat, pour in can of tomato sauce, water, and milk. Stir until combined. Add all the remaining spices and hot sauce and stir to combine. Cook, stirring occasionally, until warmed through, about 5 minutes.

To assemble: Preheat the oven to 375F. Wrap the tortillas in damp paper towels and microwave for one minute. In a glass baking dish (I used a weird 8×12-ish one I have), spread enchilada sauce across the bottom. Working one at a time and leaving remaining tortillas covered, take a tortilla, fill with 1/8 filling, roll up carefully, and place seam-side down in the dish (tortillas should be fairly full but not break when you roll them). Repeat with remaining tortillas. Top with enough sauce to comfortably cover the tortillas, then sprinkle cheese over evenly. Bake for 12 minutes or until cheese is melted. Remove from oven, let sit 5 minutes, and try not to eat four in one sitting like I did.

Ham & Chive Savory Breakfast Muffins

I work incredibly hard during the week. So when it comes to my weekends, even though I have a lot of catching up on life to do, I spend much of my time not being productive. One of my favorite non-productive activities is doodling around on Pinterest, because marking recipes I want to try feeels productive in the part of my brain that is great at rationalizing questionable life choices.
Savory breakfast muffins with ham & chives! (You'd NEVER know they're gluten free!)I tend to mark lots of recipes and only come back to a handful of them much later, but when I came across these muffins and realized I already had all but one of the ingredients in my kitchen already, I made them the very day I pinned them. I ate one or two for breakfast every day that week and never once got sick of them. I would have gone on longer, but a friend of mine at work who gave up sugar (and who used to subsist on minimum one muffin a day), begged me to keep bringing her some too.

They’re not quite muffins, exactly — more like portable, crustless, mini quiches. But they are a delight, and they’re really the perfect breakfast for someone on the go. Bonus: the recipe only uses one bowl, which is always a victory in my book.
These savory breakfast muffins are like mini quiches! Perfect when you're on the go, freeze well, AND they're gluten-free!I made a few big modifications to the original recipe. The original called for cottage cheese, and no amount of promises that the texture would melt away could get me to buy cottage cheese. (You know a texture aversion is strong if I’m not buying something with “cheese” in the name.) I also used ham instead of prosciutto, as that’s what I had. I thought they were great with just regular ham, but I’m sure they’re quite good with prosciutto too if you have it. And, of course, I substituted the small amount of all-purpose flour with gluten-free flour. Since they’re mostly almond flour, you could replace the GF all-purpose flour with tapioca starch or your other favorite grain-free flour to make these completely grain-free.

Savory Breakfast Muffins With Ham & Chives (adapted from The Kitchn)
Ingredients
1 cup ricotta cheese (I used the whole milk kind)
1/2 cup grated parmesan
4 large eggs
1/4 cup water
1/4 cup gluten-free all-purpose flour
1 cup almond flour
1 tsp baking powder
1/2 tsp paprika
1/4 tsp cayenne (optional)
1/4 tsp salt
1/4 tsp black pepper
2 ounces proscuitto or 3 ounces ham (since it’s less strong, use a bit more), diced small
1/4 cup chives, finely chopped

Preheat the oven to 400 degrees F. Line a muffin tin with paper liners and spray them all with cooking spray (DO NOT forget to spray them or you will be sorry).

In a large bowl, whisk together the ricotta, parm, eggs, and water until smooth. Add the flour, almond flour, baking powder, and seasonings, and whisk until basically smooth again. Stir in ham and chives.

Divide the batter between the muffin cups and bake for 30 minutes (muffins will be golden brown on top). Let them cool in the tin, then store them in the fridge in a resealable plastic bag.

Gluten-Free Lasagna with Brussels Sprouts & Cherry Tomatoes

I eat a lot of pasta. I’ve eaten a lot of pasta my entire life—pastina for breakfast as a baby, small shaped mixed with cheese as my first meals I made myself, and multiple family meals a week with my dad’s meat sauce, with grilled veggies, with sauce from the Italian market, with butter when I was feeling sick. Pasta makes up part of the essence of my soul. So while I do strive to eat naturally gluten-free foods as much as possible, gluten-free pasta is the one “replacement product” I can’t live without.
Wonderfully cheesy lasagna packed with sauteed Brussels sprouts and cherry tomatoes (AND it's gluten-free!)At this point, I’ve tried almost all the brands and shapes and blends of gluten-free pasta (though that’s a topic for another post). It’s been so long at this point (almost eight months!) that I no longer really feel like there’s a difference between regular and gluten-free dried pastas. After all, pasta is really mostly a vehicle for sauce. Naturally, gluten-free lasagna lends itself particularly well to being exactly like the real thing. So when I saw this recipe for Brussels sprouts lasagna on How Sweet Eats, I knew I had to adapt it.
Wonderfully cheesy lasagna packed with sauteed Brussels sprouts and cherry tomatoes (AND it's gluten-free!)And adapt it I did. I didn’t just make it gluten-free, which was a pretty easy switch. Brussels sprouts AND mushrooms AND tons of cheese just sounded like too much savory-ness to me, so I decided to swap the mushrooms for cherry tomatoes, which help counter with some sweetness. I also used mozzarella instead of provolone, because mozzarella makes up part of the essence of my soul too.

Gluten-Free Lasagna with Brussels Sprouts & Cherry Tomatoes (adapted from How Sweet Eats)
Ingredients
2 small shallots, diced small (about 1/4 cup)
2 gloves garlic, minced
10 ounces brussels sprouts, trimmed and sliced (if you’ve got a Trader Joe’s, cheat and buy their shaved Brussels sprouts)
16 ounces cherry tomatoes, halved (big mama ones quartered)
16 ounces ricotta cheese
1 cup shredded mozzarella cheese, divided
1/4 cup plus 2 tablespoons grated pecorino cheese, divided
1 package gluten-free lasagna noodles
3 tablespoons butter
3 tablespoons gluten-free all-purpose flour (your blend must contain a starch)
2 cups milk, left at room temperature for about 20 minutes
1/4 tsp nutmeg
salt
pepper
red pepper flakes
olive oil

Prepare your lasagna parts
Set a large pot of water to boil. When water is boiling, add noodles and cook for four minutes less than package directions. Drain and rinse with cold water and then either soak in an ice water bath or coat noodles with olive oil.

Meanwhile, heat enough olive oil to coat the bottom of a large skillet. Add shallots and cook until softened and beginning to turn translucent, 2 to 3 minutes, then add in Brussels sprouts and garlic and season with salt, pepper, and red pepper flakes. Cook for about 10 minutes, stirring occasionally, then add in cherry tomatoes and more salt. Cover skillet and cook another 8 to 10 minutes, stirring once or twice, until you can burst your tomatoes a bit. Remove from heat and set aside.

In a medium saucepan over medium heat, melt butter. Add flour and whisk together, stirring constantly for 2 to 3 minutes until well-combined and smelling delicious. Slowly pour in milk in a steady stream, whisking as you go, until all the milk is in. Switch to a spoon and keep stirring constantly, making sure to scrape the bottom and edges of your pot, until sauce thickens and magically becomes bechamel, about 5 to 8 minutes. Stir in 1/2 teaspoon salt, 1/4 teaspoon pepper, and nutmeg. Remove from heat.

In a medium bowl, combine ricotta, 2/3 cup mozzarella, and 1/4 cup pecorino.

Assemble your lasagna
Preheat your oven to 400 degrees F. Spread 1/4 cup bechamel at the bottom of a 9×13 baking dish. Lay three noodles down. Top them with 1/3 the cheese mixture (you will probably need to use your fingers to spread it around), 1/3 the vegetable mixture, then 1/3 the bechamel. Top with three more noodles, then repeat the cheese/veggie/bechamel layering process (now using 1/2 of what you have left). Top with three more noodles, then use the rest of the cheese/veggie/bechamel. Cover with three more noodles, then sprinkle top noodles with reserved 1/3 cup mozzarella and 2 tablespoons pecorino. Bake for 35 to 40 minutes. Let rest for 10 minutes before serving (it will be the longest 10 minutes ever).

P.S. Sorry for the absence in posting! You can thank my mom for kindly nudging me texting me and blatantly calling me out to post.

Gluten-Free Sugar Cookies

Christmas means a lot of things: twinkly lights, the fantastic smell of pine trees everywhere, looking for perfect presents — and cookies. Obviously.
GORGEOUS gluten-free sugar cookies for ChristmasMy mom gave me a fun little book with tons of beautiful ideas and instructions for decorating Christmas cookies this year…using royal icing. My only experience with royal icing before now was in the form of gingerbread house kits. All the gorgeously iced cookies you see in stores use royal icing, but it is one of the most difficult icings to work with. The consistency needs to be exactly right. You have to work very quickly and keep any icing you’re not using in airtight containers. The weather outside can affect how it mixes up.

Nervous, I decided to just decorate these cookies with piping royal icing (flood icing is a more liquid-y version that you use to cover the entire cookie). It was hard, my hand hurt, and I made a bunch of ugly cookies at first, but the end results were quite pretty! These are definitely cookies to impress.

It says a lot about the difficulty of royal icing that I went on about it for two paragraphs and haven’t even gotten to making gluten-free sugar cookie dough. The Internet, surprisingly, was not flush with very many recipe options, so I adapted a recipe from Bon Appetit Desserts instead. This dough holds together quite well, but you’ll need to keep your cookies on the thick side — roll them out no thinner than 1/4 inch. I also recommend rolling out your chilled dough on floured parchment or wax paper, putting it back in the fridge to chill for a bit, and then cutting out your cookies. (And let’s be real here — everyone knows thicker sugar cookies are better anyway.)
Gluten-free Christmas cookies YUMIf you don’t want to mess with royal icing, 2 cups of confectioners sugar + 2 tablespoons of milk + a splash of vanilla makes for a lovely glaze.

Gluten-Free Sugar Cookies
Ingredients
2 2/3 cups gluten-free all-purpose flour, plus extra for duting (I like King Arthur)
1 tsp baking powder
1 tsp xanthan gum
1/2 tsp salt
1/4 tsp nutmeg
3/4 cup sugar
1 stick (8 tablespoons) salted butter, softened
1 stick unsalted butter, softened
3 egg yolks (from large eggs)
2 tsp vanilla bean paste or vanilla extract
one batch of royal icing at piping consistency, flavored and colored to your wishes (I used a mix from my favorite baking supply store, but here are a bunch of recipes)

In a medium bowl, mix together flour, baking powder, xanthan gum, salt, and nutmeg with a fork until very well combined (then mix a little more. You do not want any unmixed pockets of xanthan gum). Set aside.

In the bowl of an electric mixer fitted with the paddle attachment, cream butter and sugar at medium-high speed until super fluffy, at LEAST five minutes. Do not get impatient; go catch up on Twitter or something. Scrape down sides of bowl and add eggs and vanilla; mix on medium speed for one minute. Scrape bowl again, then add flour and mix on stir until well combined. Divide dough into thirds. Form each portion into a disk, flatten, and wrap in plastic wrap. Chill until firm, at least two hours and up to two days.

Preheat oven to 350F. Working with one disk at a time, roll out dough on a very well floured piece of parchment or wax paper, using a well-floured rolling pin (tapered rolling pins are where it’s at). Do not roll dough any thinner than 1/4 inch. Place rolled dough back in the fridge for 5 to 10 minutes (you can start rolling out your next disk while you wait). Remove rolled dough from fridge and cut out shapes of your choice. Place on cookie sheets about 1/2 to 1 inch apart and bake for 11 minutes. Let cool on cookie sheets for a few minutes, then carefully transfer to racks to cool completely.

When ready to decorate, make your icing and decorate as you wish. If you’re a royal icing beginner like me, stripes and polka dots are a good place to start. Think before tweeting a photo of them, or your coworkers will see and you’ll have to bring them all to work.

Oven-Roasted Tomato Sauce [with BUTTER]

Winter is a great time for extensive cooking projects (lasagna, for example, or veggie burgers). But it’s also a great time to be lazy and just throw some stuff in the oven while you watch Pitch Perfect for the seventh time.
Oven-roasted tomato sauce recipe is SO easy and great for tricking people into thinking you cooked for hoursI make sauce on the stove all the time, but I’d never tried roasting tomatoes for sauce in the oven before. I’d also never gotten a recipe to look exactly like the picture in the magazine before.

This sauce is so easy that even all of you who claim you can’t cook can make it—all you have to do is dump your ingredients in a baking dish and put it in the oven. That’s it. Not kidding. This is the ultimate lazy person’s dish, and also the ultimate dish for tricking people into thinking you did way more work.
Oven-roasted tomato sauce recipe from Bon Appetit
The recipe as printed in Bon Appetit calls for quite a bit of garlic. I really love garlic, but I still thought it was too much, so my recipe below includes less than they call for. If you’re really opposed to anchovies, you can definitely omit them and not miss too much, but they do add a nice savory-ness (real word) to the sauce.

Oven-Roasted Tomato Sauce with Butter (adapted from Bon Appetit)
Ingredients
1 28-ounce can whole, peeled tomatoes (without added salt)
5 garlic cloves, peeled and smashed
2 anchovy fillets packed in oil
1/4 cup (1/2 stick) salted butter, cut into pieces
1/4 to 1/2 teaspoon crushed red pepper flakes
salt and pepper, to taste
freshly grated parmesan cheese
pasta of your choosing

Preheat oven to 425. Crush tomatoes with your hands as you add them to a glass* 8×8 baking dish. Add garlic, anchovies, butter, red pepper, salt, and pepper, stirring to combine.

Bake tomato mixture for 45 minutes, stirring things up about halfway through; anchovies and garlic should be very soft. Using a fork or snazzier mashing tool, mash up garlic and anchovies and stir to evenly distribute. Add some parmesan and stir. Combine sauce with cooked pasta, stirring until well mixed. Divide between bowls and top with lots more cheese, because cheese.

P.S. This recipe is way more fun to make if you keep pronouncing butter as BUTTEEEEEEH.

*Stonewear is okay, just do not use a metal pan — metal can sometimes react with the acid in the tomatoes and that is not a flavor you want.

Pumpkin Cupcakes with Chocolate Ganache

I’ve had the same best friend for 20 years, which means we have a lot of traditions we’ve developed over the years. One of my favorites that we started in the last few years are making pumpkin cupcakes just for us. Normally when I make a big batch of baked goods, I share them around: I invite friends over, I bring some to work, I save some for my parents. But not these cupcakes. Every year we eat the entire batch ourselves.
Pumpkin cupcakes with chocolate ganache frosting...SO much better than even cream cheese frosting!This was one baked good I was determined to make work gluten-free; I love them too much to skip them. Luckily, this recipe adapts particularly well (I’m guessing it’s because it has so many eggs to help bind things together, along with the pumpkin to keep things moist).

The combination of pumpkin cake and chocolate ganache is literally the greatest. I don’t know how the world has not capitalized on this combination yet. But if you want to try it, don’t ask me; I’m not sharing.

Gluten-free Pumpkin Cupcakes with Chocolate Ganache Recipe (makes 18-20; adapted from Martha Stewart)
Ingredients
2 cups gluten-free all-purpose flour (use regular flour if you’re not GF; I love King Arthur for both)
1 tsp baking powder
1 tsp baking soda
1 tsp xanthan gum
1 tsp ground cinnamon
1 tsp ground ginger
1/2 tsp pumpkin pie spice
1/4 tsp ground nutmeg
1 cup packed brown sugar
1 cup granulated sugar
1 stick salted butter, melted and cooled (1/2 cup)
1 stick unsalted butter, melted and cooled (1/2 cup)
4 eggs, lightly beaten
2 tsp vanilla bean paste (or vanilla extract, as long as it’s the real deal)
1 15-ounce can pumpkin puree
9 ounces chocolate chips or chopped semi-sweet chocolate
1 cup heavy cream

Preheat oven to 350 degrees and line muffin tins with liners. In a medium bowl, stir together flour, baking powder, baking soda, xanthan gum, and spices (through nutmeg) with a fork. Set aside.

In a large bowl, whisk together butters and sugars. Whisk in eggs and vanilla, stirring quickly and making sure everything is well combined. Whisk in dry ingredients, making sure to scrape bottom and sides of bowl to get everything in there. Whisk in pumpkin puree until smooth.

Divide batter between liners (they will be about 2/3 to 3/4 full). Bake until a toothpick inserted in the center of your middle cupcakes comes out clean, 24 to 28 minutes, rotating pans from top to bottom and back to front halfway through. Let cool in pans for 5 minutes, then transfer to a rack to cool completely.

When cupcakes are cool, put chocolate in a medium bowl. In a small saucepan, heat heavy cream until it’s steaming, but not boiling. Pour cream over chocolate and let sit for one minute, then stir until all chocolate is melted and smooth. Let mixture chill in the fridge until it’s stiffened a bit, 20 to 30 minutes. Remove from fridge and dip cupcakes into chocolate twice. Store cupcakes in the fridge until you eat them all.

Life Lately

Oh poor blog, I am so sorry for abandoning ye. But you’ve always been in my heart, I promise!

A month ago I started a new job at Cosmopolitan.com. New jobs generally tend to take up a lot of time, but when you LOVE your new job, they take up even more time without you realizing, because you are enjoying every second of it.

But I have been squeezing in some cooking to my crazy new life, and promise to share recipes soon! To tide you over, here are some delicious adventures I’ve had lately:

Australian gluten free treatsEnjoying gluten-free treats my mom brought me all the way from Australia (those chocolate cookies are crumbly but goooood.)

Gluten free chocolate cupcakesSpending the weekend in Atlanta with a bunch of my closest friends from college, staying with a friend’s parents who happen to be gluten-free and whose mom made this INCREDIBLE chocolate cupcake with chocolate mousse, marshmallow, and chocolate fudge.

Halloween sushiEnjoying my new gluten-free-friendly cafeteria (GF bread! GF signs on everything I can eat! GF soy sauce!), which gets really into the holidays.

Potato pastaTrying new (to me) restaurants in NYC with gluten-free options, like this pasta made out of potatoes at Sauce.

ABC kitchen And trying fancy restaurants too, like ABC Cocina. My best friend and I made a pact to try new restaurants each weekend, rather than continuously going to our old standbys. Best pact ever.

How to Copycat the Pies n Thighs Chicken Biscuit [Gluten Free Optional!]

If you know me, you know that sandwiches are my favorite food (some people find this controversial, but it’s valid, the end). Every year I look for a new favorite sandwich of the year, and a few years ago I discovered the chicken biscuit from Pies n Thighs in Williamsburg, Brooklyn. It’s a juicy piece of boneless fried chicken on a biscuit that’s been slathered with honey butter and doused in hot sauce. It is, in a word, glorious. I’ve been missing it since going gluten free, so I decided to try to recreate it without the gluten. And…
Spicy fried chicken biscuit with honey butter and hot sauce (inspired by Brooklyn restaurant Pies n Thighs)
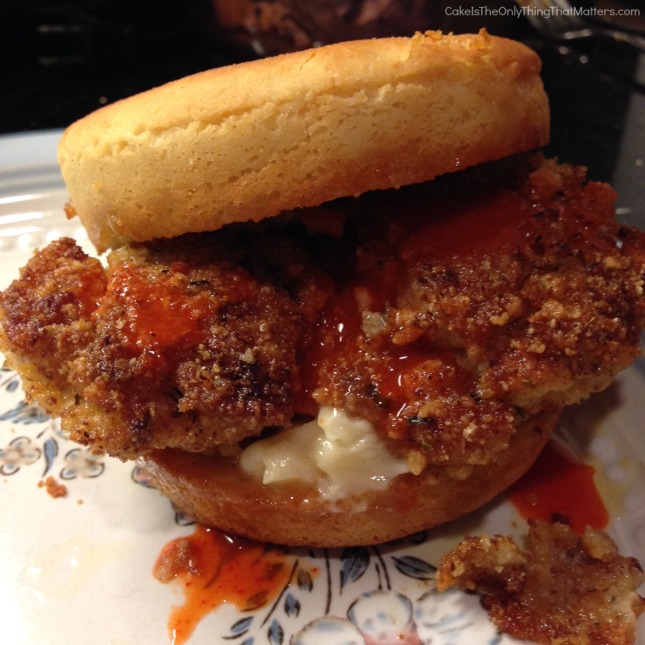
It was surprisingly easy, and tasted exactly like the real version! Even if you’ve never had the real thing, this is a great impressive meal to make, and you’ll be sorry when you’ve finished your last bite. (And if you want the glutens, just use regular breadcrumbs!)

Pies n Thighs Chicken Biscuit Recipe [Copycat version]
Ingredients for the Marinade
1 package boneless, skinless chicken thighs (mine had 4)
2 cups buttermilk
2 tablespoons sriracha or other hot sauce
1 tablespoon Dijon mustard
1 tsp salt
1 tsp cayenne
1 tsp paprika
1/2 tsp black pepper

Ingredients for Breading
3/4 cup gluten-free breadcrumbs
3/4 cup almond meal (if you’re making these with gluten, you can use all breadcrumbs, but I’d recommend using almond meal anyway as it adds a great flavor)
1 tsp salt
1 tsp cayenne
1 tsp thyme
1/2 tsp black pepper
1/4 tsp garlic powder
1/4 to 1/2 tsp amounts of any other dried herbs you like (I added some basil and oregano)
olive oil

Ingredients for Serving
gluten-free biscuits, rolls, or English muffins, halved and toasted (I recommend the Trader Joe’s French rolls)
4 tbsp salted butter, room temperature
2 tbsp honey
hot sauce of your choice (like Frank’s Red Hot or Cholula)

For the marinade: pour buttermilk into a large (non-metal) bowl. Add in hot sauce, mustard, salt, cayenne, paprika, and pepper and whisk together until well mixed. Set aside. Take your chicken thighs out of the package, trim any fat, and pound them out a bit thinner between pieces of plastic wrap. Submerge chicken in buttermilk mixture, making sure it’s completely covered, and let marinate in the fridge for at least 3 hours and up to 24, stirring things around once or twice.

When you’re ready to cook: in a large plate, mix together breadcrumbs, almond meal, salt, cayenne, thyme, pepper, garlic powder, and any other herbs with a fork until well distributed. Take each piece of chicken out of the buttermilk, let the excess drip off, and then dredge in crumb mixture until both sides are coated.

Heat enough olive oil to more than comfortably coat the bottom of your pan over medium heat. When it’s hot enough (toss in some breadcrumbs and they’ll sizzle), cook chicken–probably in batches of two so as not to overcrowd your pan–until browned on both sides and cooked through, about 5 minutes per side. (When flipping chicken, use a thin metal spatula to ensure that coating comes with the chicken.) While chicken cooks, mix together honey and butter in a small bowl until combined.

When ready to serve, divide honey butter between rolls. Top bottom half with chicken, douse with hot sauce to taste (more is better), and top with other half. Grab a lot of napkins, and dig in.

Statement Necklace Board Straight Out of Pinterest

I spent the last week taking some time off to relax before starting a new job, and set myself a long list of projects: visiting my grandma, making homemade veggie burgers, taking a bunch of spin classes, and finding a better way to store my statement necklaces (mushed in a tangled pile isn’t a great one). I knew I wanted to hang them somehow, but since cork boards are ugly I decided to pretty one up. The result is this super easy storage method that looks really pretty too.
Incredibly easy to make, GORGEOUS way to display and store your statement necklaces
Statement Necklace Display & Storage Board
Materials

square piece of cork board (designed in the back to be hung on the wall)
piece of thick paper in design of your choice, at least 4 inches bigger in both directions than your cork board
glue stick
scissors
decorative push pins
necklaces (most of these are from JCrew/Factory)

Take your glue stick and cover the whole of your cork board in glue. Carefully lay paper (centered) over it, smoothing as you go. Cut a diagonal line in overhanging paper at corners. Working one side at a time, glue side and back of cork board and carefully fold paper around edges of board, cutting and tucking at corners, so that board appears completely wrapped. Let dry at least one hour.

Stick pushpins along the top of your board at even intervals. Lay board on a flat surface and decide what order you want to display necklaces in (I recommend alternating bulky and more delicate ones) first. Remove necklaces, then hang board on your wall (mine came with screws but I just used two nails, a hammer, and the leveler in the compass app on my iPhone). Carefully hang necklaces from pins, and behold your handiwork.